 zuka
zukaこんにちは。zuka(@beginaid)です。
この記事は,Ecsiteを自作するシリーズになります。今回はサービス一覧画面を記述します。
その他のシリーズ記事は以下の目次をご覧ください。
完成品デモ
全体フロー
この記事では,以下のようなログアウト処理のフローを目指します。
流れ図
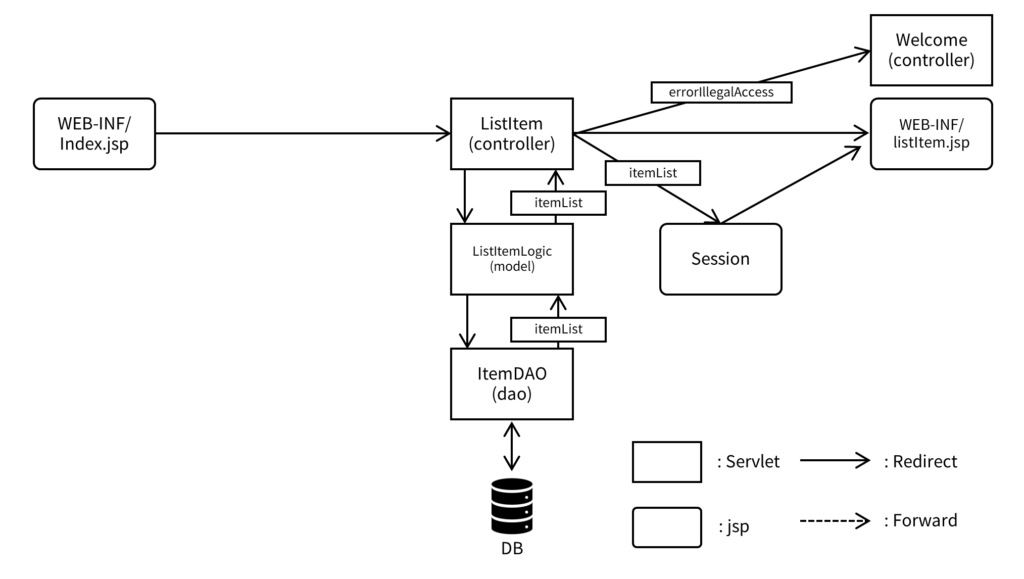
説明
ログイン処理と同様,直接jspファイルにはアクセスできないような設計にしています。そのため,全てのjspファイルはWEB-INFディレクトリ下に配置しています。WEB-INF下に配置するとforwardは動作しますが,redirectが通らなくなります。そこで,jspファイルにredirectしたい場合は一回何らかのサーブレットを経由するようにします。
ログイン処理と同様,今回のログイン処理はMVCモデルに則っています。計算処理などを担当するModelはJavaのクラス,ページ表示を担当するViewはjsp,橋渡し役をするControllerはサーブレットによって実現させています。
今回新しく作成するファイルは,以下のようになっています。
- Model
- Item
- ItemDAO
- ListItemLogic
- View
- listItem.jsp
- Controller
- ListItem
実装
以下では実装を確認していきます。Model,View,Controllerに分けてお伝えしていきます。
Model
データベースに対応するItemクラスを作成します。引数ありコンストラクタとsetter/getterからなるため,情報を保持するクラスとしての役割を果たします。
package com.cod_aid.model;

public class Item {
	private String itemId;
	private String itemName;
	private String itemUrl;
	private String imageUrl;
	private int price;
	private String unit;
	private String label;
	private String description;
	private boolean isDelete;

	public Item() {
	}

	public Item(String itemId, String itemName, String itemUrl, String imageUrl, int price, String unit, String label,
			String description, boolean isDelete) {
		this.itemId = itemId;
		this.itemName = itemName;
		this.itemUrl = itemUrl;
		this.imageUrl = imageUrl;
		this.price = price;
		this.unit = unit;
		this.label = label;
		this.description = description;
		this.isDelete = isDelete;
	}

	public String getItemId() {
		return itemId;
	}

	public void setItemId(String itemId) {
		this.itemId = itemId;
	}

	public String getItemName() {
		return itemName;
	}

	public void setItemName(String itemName) {
		this.itemName = itemName;
	}

	public String getItemUrl() {
		return itemUrl;
	}

	public void setItemUrl(String itemUrl) {
		this.itemUrl = itemUrl;
	}

	public String getImageUrl() {
		return imageUrl;
	}

	public void setImageUrl(String imageUrl) {
		this.imageUrl = imageUrl;
	}

	public int getPrice() {
		return price;
	}

	public void setPrice(int price) {
		this.price = price;
	}

	public String getUnit() {
		return unit;
	}

	public void setUnit(String unit) {
		this.unit = unit;
	}

	public String getLabel() {
		return label;
	}

	public void setLabel(String label) {
		this.label = label;
	}

	public String getDescription() {
		return description;
	}

	public void setDescription(String description) {
		this.description = description;
	}

	public boolean isDelete() {
		return isDelete;
	}

	public void setDelete(boolean isDelete) {
		this.isDelete = isDelete;
	}

}
続いて,データベースとのやりとりを記述するItemDAOです。ItemDAOはデータベースとのコネクションを確立するBaseDAOを継承するという形で設計します。
package com.cod_aid.dao;

import java.sql.Connection;
import java.sql.PreparedStatement;
import java.sql.ResultSet;
import java.sql.SQLException;
import java.util.ArrayList;

import com.cod_aid.model.Item;

public class ItemDAO extends BaseDAO {
	final static String sqlGetAllItem = "select item_id, item_name, item_url, image_url, price, unit, label, description, is_delete from items where is_delete = false";

	public ArrayList<Item> getAllItem(Connection con) throws SQLException {
		ArrayList<Item> itemList = new ArrayList<Item>();
		try (PreparedStatement stmt = con.prepareStatement(sqlGetAllItem)) {
			try (ResultSet rs = stmt.executeQuery();) {
				while (rs.next()) {
					String itemId = rs.getString("item_id");
					String itemName = rs.getString("item_name");
					String itemUrl = rs.getString("item_url");
					String imageUrl = rs.getString("image_url");
					int price = rs.getInt("price");
					String unit = rs.getString("unit");
					String label = rs.getString("label");
					String description = rs.getString("description");
					boolean isDelete = rs.getBoolean("is_delete");
					Item item = new Item(itemId, itemName, itemUrl, imageUrl, price, unit, label, description,
							isDelete);
					itemList.add(item);
				}
			}
		} catch (SQLException e) {
			System.out.println("SQLException: " + e.getMessage());
			System.out.println("SQLState: " + e.getSQLState());
			System.out.println("VendorError: " + e.getErrorCode());
			e.printStackTrace();
			throw e;
		}
		return itemList;
	}
}
最後に,controllerから指令を受けてDAOを呼び出すListItemLogicです。
package com.cod_aid.logic;

import java.sql.Connection;
import java.sql.SQLException;
import java.util.ArrayList;

import javax.naming.NamingException;

import com.cod_aid.dao.ItemDAO;
import com.cod_aid.model.Item;

public class ListItemLogic {

	public ListItemLogic() {
		super();
	}

	public ArrayList<Item> getAllItem() throws SQLException, NamingException {
		ItemDAO itemDao = new ItemDAO();
		try (Connection con = itemDao.connect();) {
			return itemDao.getAllItem(con);
		}
	}
}
View
サービス一覧画面を出力するlistItem.jspは以下の記事で詳しく説明しています。
Controller
Controllerはログイン済みのユーザしか見られないものとします。ログインしているかどうかはuserオブジェクトがsessionに格納されているかどうかで判断します。ログイン済みのユーザであることが分かれば,DAOを呼び出して全ての商品情報が格納されたArrayListを受け取り,次のjspで商品を一覧表示するためにsessionに格納します。
package com.cod_aid.controller;

import java.io.IOException;
import java.sql.SQLException;
import java.util.ArrayList;

import javax.naming.NamingException;
import javax.servlet.ServletException;
import javax.servlet.annotation.WebServlet;
import javax.servlet.http.HttpServlet;
import javax.servlet.http.HttpServletRequest;
import javax.servlet.http.HttpServletResponse;
import javax.servlet.http.HttpSession;

import com.cod_aid.logic.ListItemLogic;
import com.cod_aid.model.Item;
import com.cod_aid.model.User;

@WebServlet("/ListItem")
public class ListItem extends HttpServlet {
	private static final long serialVersionUID = 1L;

	public ListItem() {
		super();
	}

	protected void doGet(HttpServletRequest request, HttpServletResponse response)
			throws ServletException, IOException {
		HttpSession session = request.getSession();
		User user = (User) session.getAttribute("user");
		if (user == null) {
			session.setAttribute("errorIllegalAccess", "errorIllegalAccess");
			response.sendRedirect("Welcome");
		} else {
			ListItemLogic logic = new ListItemLogic();
			ArrayList<Item> itemList = new ArrayList<Item>();
			try {
				itemList = logic.getAllItem();
				session.setAttribute("items", itemList);
				request.getRequestDispatcher("/WEB-INF/listItem.jsp").forward(request, response);
			} catch (SQLException e) {
				e.printStackTrace();
			} catch (NamingException e) {
				e.printStackTrace();
			}
		}
	}

	protected void doPost(HttpServletRequest request, HttpServletResponse response)
			throws ServletException, IOException {
		doGet(request, response);
	}
}
JUnit単体テスト
JUnitを用いてUserDAOの単体テストを行う場合,サーブレットコンテナ(tomcat)は起動しないため,データベースとのコネクション確立を行う方法が変わります。詳しくは以下で説明しています。
コメント